On Christmas Day night we were feeling lethargic and bloated and we knew we needed healthy vegetables and rice for dinner. I mustered the strength to try making something I'd only ever eaten in restaurants before.
A couple weeks ago I'd bought some nori, the dried seaweed sheets used in Japanese cuisine. I'd been wanting to make maki, the rolls with rice and, for me, veggies, but for some others, fish or crab, like California rolls. Kapa maki is the basic cucumber roll.
From several different web sources plus my own experience in eating maki, I pieced together a how-to.
First I made the rice. I made the smallest amount my rice cooker allows, which is 4 cups prepared. Once the rice is cooked, spread it on a rimmed baking sheet so it will cool evenly. Sprinkle some rice vinegar and toss--doing this while it's still warm will help reduce clumping. You want it sticky, but not totally clumped together.
While the rice cools, slice the cucumber or other fillings you plan on rolling. I did cucumbers and red peppers. You want long, thin slices. Peel the cucumbers, quarter them lengthwise, and slice out the seeds. Then slice them lengthwise again into 4 or 5 strips.
This is where I started following the directions on the nori package. Lay a piece of nori, shiny side down, on your sushi mat. Place one cup of the prepared rice on the nori, spreading it evenly over the two-thirds of the nori that is closest to you. Keep a bowl of water handy to wet your fingertips while you're working to make it easier to handle the rice. Make an indentation in the middle of the rice, along the thirds line. Place 3 or 4 strips of cucumber in the indentation.
Start rolling. Use the mat to apply even pressure as you're rolling. As you roll, tuck the bottom edge of the nori in behind the cucumber, then keep rolling with medium pressure. Moisten your fingertips to close and secure the top edge of the nori to the roll.
Place on a cutting board and slice evenly, wetting the knife every couple of slices to keep the rice from sticking to it.
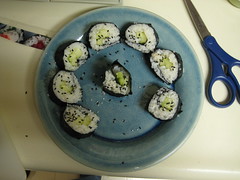
Four cups of rice yielded 4 maki. We made 3 with cucumber and one with red peppers. We added a dash of water to powdered wasabi. (This wasabi was much stronger than we've had in restaurants!)
Maki turned out to be so easy, we can't believe we hadn't tried it before! I can add all sorts of fruits and vegetables for the filling. It would be great appetizers for a party. And it's so good for you! Rice and veggies, that's basically it.

28 December 2007
15 December 2007
diablo oriental foods
Why oh why did I wait so long to check out Diablo Oriental Foods? It's right around the corner from my home and all the times I mused about making my own maki... I could have made my dreams come true so easily.
This is a small market. The selection isn't stellar, but what they do have is some very specific Japanese food ingredients that you'll be hard-pressed to find elsewhere. They have a small selection of Asian vegetables, some of which I'd never seen before. They also have some fresh meats and fish. The prices are decent. Some of the jars of stuff seemed pricey and that could have to do with weight and importing. But my needs were few and I shopped smartly so for $11 I bought a mini-steamer for veggies in the microwave, a bag of chunky sea salt for my salt grinder, a shaker of furikake (both the furiakake and sea salt are probably large enough to last for 6 months, since they aren't things we use every day), and a pack of nori with 10 large sheets. They have a small selection of houseware, including some bento supplies, but that's some of the stuff that seemed more expensive.
I could have gone crazy buying quite a bit more. But I walked there, plus until we know exactly when we're moving and what our packing strategy will be we're trying to curb purchases.
Since it's not easy for me to get to Ichiban Kan or Daiso, Diablo Oriental Foods will have to satisfy my craving for the time being. It's not the same, but it's a taste.
12 December 2007
what i eat in africa
What I eat in Africa is something I'll be discovering very soon. In case you haven't heard, Mike's job is transferring us to Bujumbura, Burundi, in East Africa next year.
When going through the medical clearance process, no one questioned my celiac disease. And I was ready to defend it. I knew that wheat is not a major staple in most of the countries we could possibly be sent to. Since we're allowed to bring a couple thousand pounds' worth of our own pantry items from home, I knew I'd just bring Bob's Red Mill instead of Duncan Hines. I was keeping my fingers crossed for a place with lots of fresh fruits and veggies.
And I think I hit the jackpot. From eDiplomats.com:
This is all excellent news! We've also heard that rice, peanuts, and Indian and other Asian spices are available and inexpensive. Our eating habits won't have to adjust that much, except for trying all the new dishes. And the lack of dairy--there's apparently very little in the way of good fresh milk. That will probably be the biggest culinary problem for us. (The parts I left out with the ... pertain to how what little processed food is available is expensive because it's all imported from Europe.)
I don't consider myself an adventurous eater, I just like fresh food instead of processed. Many of our peers look at this information and cringe about how they'll have to bring all their cans of Progresso soup from home. I say, "Hopefully it won't be that much different than going to farmers' market here."
When going through the medical clearance process, no one questioned my celiac disease. And I was ready to defend it. I knew that wheat is not a major staple in most of the countries we could possibly be sent to. Since we're allowed to bring a couple thousand pounds' worth of our own pantry items from home, I knew I'd just bring Bob's Red Mill instead of Duncan Hines. I was keeping my fingers crossed for a place with lots of fresh fruits and veggies.
And I think I hit the jackpot. From eDiplomats.com:
Fresh tropical fruits, such as bananas, a papayas, mangoes, pineapples, Japanese plums, citrus, avocados, and strawberries are available and inexpensive. Vegetables, including cucumbers, green beans, dried beans and lentils, green peas, cabbage, tomatoes, artichokes, carrots, cauliflower, beets, lettuce, potatoes, turnips, onions, green onions, leeks, and green peppers are also inexpensively available. Fresh spices are also found, including thyme, oregano, basil, rosemary, sage, cilantro, fennel and parsley.... There are many local butcheries, which supply good quality beef, pork, lamb, goat, and poultry. Turkeys are raised in a nearby Italian Mission. A variety of sausages and coldcuts are made locally.... Burundi coffee and tea are excellent and inexpensive.
This is all excellent news! We've also heard that rice, peanuts, and Indian and other Asian spices are available and inexpensive. Our eating habits won't have to adjust that much, except for trying all the new dishes. And the lack of dairy--there's apparently very little in the way of good fresh milk. That will probably be the biggest culinary problem for us. (The parts I left out with the ... pertain to how what little processed food is available is expensive because it's all imported from Europe.)
I don't consider myself an adventurous eater, I just like fresh food instead of processed. Many of our peers look at this information and cringe about how they'll have to bring all their cans of Progresso soup from home. I say, "Hopefully it won't be that much different than going to farmers' market here."
08 December 2007
chiles rellenos
What do I do when Planet Organics drops four unexpected poblano (or pasilla) chiles on my doorstep because I wasn't paying careful enough attention to my produce order?
Chiles rellenos! I'd never had this at a restaurant because of the breading. But Mike loves these cheesy chiles, especially from one particular place that was our favorite Mexican restaurant in San Diego. So I set about figuring out a way to make them at home with my beautiful accidental poblanos. Between online searches and rifling through cookbooks I couldn't find anything that jived with Mike's memory of the specific chiles rellenos. But I figured out the basic idea and I used Joy of Cooking as my main guideline.
First I roasted the peppers. To roast in the oven, place them on a baking sheet and broil for a few minutes, turning two or three times for evenness. Make sure you use tongs for turning them; a fork might pierce the skin. They're done when the skin starts to blister and turn black. Once they're cool enough to handle, peel off the skins.
Then I came to my first impasse. How do I get the cheese in and the veins and seeds out? I wanted to bread them, which makes it difficult to make a long, lengthwise slice. None of the recipes I found made the chiles exactly the way I wanted them, so I had to wing this part. I made two slices near the stem, forming a T. I was able to get my paring knife into the T and with a little careful wriggling I cut out the bulk of the seeds near the base of the stem and most of the veins. After that, shoving in the cheese was a cinch.
I grated some Monterey Jack cheese to stuff the peppers. I also threw in some kidney beans. I couldn't come up with a good side dish, making the chiles rellenos the only course, so I wanted them to be slightly healthier than breaded cheese. Beans make a good filling because they are nonfat yet high in fiber and protein.
Phew. Next step, breading. Usually I recruit Mike for this job but being my first stab at chiles rellenos I wanted to have my hands on every step. It was surprisingly easy to handle the stuffed peppers. They are sturdy yet pliable. Dipping them in potato starch then in egg made a nice sticky paste that sealed the slices together quite nicely.
For bread crumbs I used Southern Homestyle Tortilla Crumbs. I had never even heard of tortilla crumbs, yet lo and behold, I found a new grocery store recently and they sold tortilla crumbs. Theoretically, you'd think they'd be the perfect breading for chiles rellenos.
I baked my breaded chiles in the oven at 350 degrees for 15 minutes. Since they're already roasted, they're soft enough to eat. You just need to get the cheese all warm and melty.
And boy were these warm and melty! The taste wasn't perfect and Mike and I have a few ideas for improvement. But lots of melted cheese heals all ills. (Except lactose intolerance I guess.) We deemed these chiles pretty good for a first effort. The breading wasn't quite as thick and crispy as we both like. Mike's the breading genius so I'll let him do it next time. And more flavor was needed in the stuffing. I'm thinking either garlic or green onions next time. Poblano chiles are mild, so if you want a little kick you need to add it. Maybe a bit of chopped serrano?
07 December 2007
chili-roasted acorn squash
I got this from Everyday Food.
I also made plain quinoa to serve the squash on. Something was not quite right about this meal. It was warm and filling but the taste was off. Maybe it was a sub-par squash. Maybe just because Martha says it's okay to eat the skin of an acorn squash that doesn't necessarily mean that you should. Maybe it needed a bit more salt and pepper. Whatever the case, last night was cold and rainy and we gobbled up this warm, comforting dish.
2 acorn squash (1 1/2 pounds each), halved lengthwise, seeds removed
2 tablespoons olive oil
2 teaspoons chili powder
Coarse salt and ground pepper
1. Preheat oven to 450 degrees. Cut each squash half into several wedges, then halve wedges crosswise.
2. On a large rimmed baking sheet, toss squash with oil and chili powder; season with salt and pepper, and toss again. Roast until tender and starting to brown, 20 to 25 minutes, tossing halfway through. (This is the full recipe for 4; I halved it.)
I also made plain quinoa to serve the squash on. Something was not quite right about this meal. It was warm and filling but the taste was off. Maybe it was a sub-par squash. Maybe just because Martha says it's okay to eat the skin of an acorn squash that doesn't necessarily mean that you should. Maybe it needed a bit more salt and pepper. Whatever the case, last night was cold and rainy and we gobbled up this warm, comforting dish.
stuffed grape leaves (dolma)
 Stuffed grape leaves are one of those foods I never got around to trying until recently when Mike and I were starving for a quick dinner, came across a Mediterranean cafe, and it was the only menu item that appeared to be gluten-free. I was hooked. And according to Mike, who eats them all the time, the ones at that restaurant weren't even very good.
Where do I go to figure out these ingredients and make stuffed grape leaves on my own? What's in the stuffing? Where do I get grape leaves? First stop, Moosewood. Mollie Katzen has a recipe for a rice pilaf that she uses for stuffing grape leaves, artichokes, and eggplant. (It's also great on its own.) You can buy grape leaves in a jar (I found them at both Whole Foods and Safeway).
Mollie Katzen's Greek Pilaf
1 1/2 cups raw brown rice (long- or short-grained)
2 1/4 cups water
1 to 2 Tbs olive oil
1 1/2 cups mince onion
1 small stalk celery, minced
1/2 tsp salt
1/2 cup lightly toasted sunflower seeds or pine nuts
black pepper, to taste
4 to 5 medium cloves garlic, minced
2 Tbs lemon juice
1/4 cup freshly minced parsley
1 Tbs dried mint (or 3 Tbs fresh, minced)
1. Place rice and water in a small saucepan. Bring to a boil, cover, and simmer until tender (about 40 minutes).
2. Meanwhile, heat the olive oil in a small skillet. Add onion, celery, and salt, and saute until the vegetables are tender (5 to 8 minutes). Add sunflower seeds or pine nuts, black pepper, and garlic. Saute for 5 minutes.
3. Stir the sauteed mixture into the cooked rice along with lemon juice and herbs. Mix well.
This rice pilaf is so totally delicious on its own, it's hard not to eat it before you've rolled it all up into the grape leaves. We aren't huge onion fans, so I use about half of what the recipe calls for. Also, Mike has an irrational hatred of celery so I leave it out entirely. I've used pine nuts and haven't tried sunflower seeds yet. I always add salt and pepper to taste at the end when I mix in the herbs rather than saute it with the onion mixture.
 I've had trouble with rolling the leaves, but Mike figured it out quickly, so I like to put him to work doing this. Lay out a leaf on your work surface. The leaves should be between 3 and 4 inches wide. Place a spoonful of rice pilaf near the stem end. Fold in the side and roll toward the tip. You can heat these up in the oven for about 20 minutes to warm through (the way I like them) or eat them cold and slimy (the way Mike likes them). I mix a little plain yogurt* with lemon juice for dipping. You can also make a quick tahini-lemon dip that's also tasty with them.
These are also great to make ahead and keep in the fridge for a few days. For storage I drizzled a little olive oil over them to keep them moist.
*For vegan or dairy-free, omit the yogurt sauce.
02 December 2007
crave bakery monster cookie
 Have you ever bitten into a fresh cookie at a bakery and thought "Okay, I can die happy now." The Monster Cookie from Crave Bakery made me feel that way. And it came from a package in a freezer.
 This cookie has the ridiculously rich sweetness of raw cookie dough. The cookie and the chocolate chips melt in your mouth. There's an unexpected warm apple-cinnamon feeling. I never wanted this cookie to end.
About half-way through the cookie I had to stop and take a breather. It was just too good. During that rest I looked up Crave Bakery's website to see if they have a storefront where I can buy cookies fresh in San Francisco. It appears that they don't, unfortunately.
If you live in California, Washington, Oregon, and Nevada you can buy them in select stores. Crave also sells the cookies in bulk from their website. They are shelf-stable for 7 days or can be frozen for longer. I bought mine frozen at Whole Foods. After about 90 minutes on the counter at room temperature it was perfectly ready to eat. I bet if you zapped it in the microwave for a few seconds it would be not only gooey but pleasingly warm.
Crave offers the monster cookie, a brownie cookie, a chocolate cake and a pumpkin tart. All products are gluten-free and casein-free. The individual packaging of each cookie makes them great for travel snacks. (I was going to say kids' lunches, but in retrospect I think it's too sweet for a kid to eat the whole thing in one sitting.)
I'll be looking for the brownie on my next grocery shopping trip. If it has all the goodness of the cookie, but with chocolate... I can't even complete that thought.
(Logo image from the Crave website.)
01 December 2007
grindstone bakery
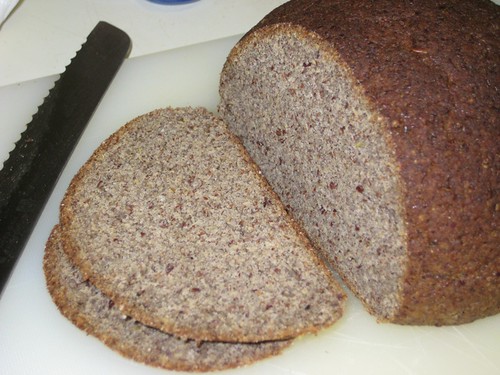
When I heard about Grindstone Bakery's fresh-baked gluten-free bread I thought it was too good to be true. It seems impossible to find gf bread that isn't frozen, vacuum-sealed, or both, to ensure "freshness." I decided to pay the price ($10) to find out how it would be.
It wasn't exactly warm from the oven, but it was a fresh loaf. The first thing I thought was, "Whoa. Heavy." It's as heavy and nearly as dense as a brick. It certainly is a hearty bread. It's not a nice, soft, "bready" loaf. (I don't know about anyone else, but I miss a good, soft bready bread.) But the taste is pretty good. For the first day or two it was moist enough to eat without toasting. It does make a very tasty slice of toast though, especially when sliced thick so the outside gets crispy and the inside gets warm and soft. Eat it fast though. In less than a week it looks like this:
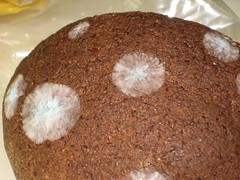
One of the ingredients listed is raisin juice. Huh? Isn't a raisin a raisin because it lacks juice? Whatever it is, it seems to be what gives this bread a moist chewiness, almost stickiness. And as you can see from the photos, it's an attractive loaf of bread, even when moldy. This would be a good bread to serve with a hearty winter meal. A toasted slice next to a bowl of soup could be an entire meal, actually. This bread is filling.
I ordered mine through Planet Organics. You can order directly from Grindstone Bakery and if you live in the San Francisco area you can buy their loaves at some local stores. They have a variety of whole grain wheat-free and gluten-free artisan loaves. The gluten-free loaves are made in a separate facility with a grinding wheel that is only used for gluten-free grains. All of their breads are also yeast- and dairy-free.
20 November 2007
celiac thanksgiving
Thanksgiving can be the most depressing holiday for a celiac. It's a whole day that centers around food. And no one wants to feel left out of the festivities. Part of being a celiac isn't just the food, it's the psychology of standing out in a crowd or having to worry about every bite. I've found that I hate standing out with the "special meal." I want to fit in and eat the same food as everyone else. Thus, the most comforting thing for me is being invited to the home of someone who is aware of the simple steps that can be taken to make a gluten-free Thanksgiving that's delicious for everyone.
Turkey. Make sure it's gluten-free. It seems like a no-brainer, but some turkeys are injected with, I don't know, delicious turkey flavor I guess. Whatever it is, some of those injection juices contain gluten, so check the ingredients on the turkey before you buy it.
Stuffing. If you absolutely must serve grandma's traditional bread stuffing, bake it on the side rather than in the turkey. Gluten can be transferred. If you want to stuff the bird, use a rice stuffing or a pure cornbread stuffing. Check those packages of cornbread mix--some add regular flour. Make sure the cornbread is made from pure cornmeal or corn flour. If you add sausage to the stuffing, make sure it's a GF sausage. Sometimes wheat is used as a filler. MSG is okay, though. It's not gluten, it's a corn-based additive.
Gravy. Use cornstarch instead of regular flour.
Potatoes, squash, and other vegetables. They are inherently gluten-free. If you're adding sour cream or cream cheese to mashed potatoes, though, check to make sure modified food starch is not on the ingredients list.
Cranberry sauce. Check the cans and tubs for wheat, modified food starch, or suspicious "natural flavoring".
Rolls and bread. These can be tricky because most GF bread just isn't as good as the regular stuff. (Although in my family those terrible, tasteless snowflake rolls were always served. I've learned to just skip the rolls altogether.) It's one thing I'd rather politely decline than eat a GF substitute.
Dessert. Traditional pies take a little effort. But I think it's worth it. The celiac doesn't want to be eating plain old GF cookies while everyone else digs in to pumpkin pie. At Whole Foods and many other specialty health food stores you can buy GF pies frozen. Some health food stores also contract with local bakeries for fresh pies. GF pie crust mixes and recipes are readily available if you want to bake your own.
Appetizers/snacks. Corn chips are safe as well as vegetable crudites. Make sure dips are free of modified food starch and wheat. Have two cheese plates: one with GF crackers and one with regular crackers.
If the celiac or the parents of the celiac are making the bulk of the meal, I'm sure you'll be making it gluten-free and none of the non-GF guests will even notice. If you are inviting celiac guests and they ask if they can bring something, tell them "Yes!" Celiacs need to be assured that we have control over some of our food.
This year I've been asked to bring a dessert and I think I'll go with my carrot cake. The cream cheese icing is so sweet and decadant! I know that GF crackers will be present and the stuffing will be rice. (I'm not a huge gravy fan, but I know it will be made with cornstarch anyway.)
I give thanks to my friends and family members who help make my life a little easier when it comes to eating.
(Cross-posted at Where in the World Am I?
11 November 2007
arico almond cranberry cookies
 Arico Almond Cranberry Cookies. I'm always suspicious of "health food" cookies. I don't buy in to the marketing copy about soulful, mindful snacking, breathing deep to enjoy the essence of the citrus zest and all that stuff. So I was suspicious of the hippie marketing on this bag of cookies as well. (It's all on the back. The front of the bag fools you into thinking it's a modern industrial cookie.)
 But I love cookies in general so I had to give them a try. These are surprisingly tasty little cookies. Arico promises "moist & chewy," and they do a pretty good job. They were moister and chewier than I expected and the ziploc bag keeps the cookies fresh for several days after opening. I was impressed at the lack of dry crumbliness.
They have lots of strong almond and cranberry flavor and they are fairly sweet. They use the hip new "health food" sweetener agave nectar. Arico prides itself on high-quality organic ingredients for making gluten-free and dairy-free snacks. (They go so far as to note the eggs are cage-free on the ingredients list. Don't get me started on the "cage-free" myth.) They have several varieties of cookies, including chocolate, and Arico also produces snack bars. I have only tried the Almond Cranberry cookies.
I bought these at Whole Foods. The Store Locator on the Arico website does not appear to be current, since Whole Foods didn't appear on the list. You can buy the cookies in bulk directly from the Arico site or call your nearest health food store.
I'll continue to buy these one or two packages at a time. It's nice to have a fruity cookie on hand in the pantry for tea time. (If we end up moving to Africa next year I'll probably buy a case or two from Arico.)
(Image from Arico Foods website.)
dolce senza grano tortes
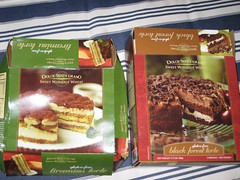
"Sweet without wheat" is what it says on these frozen cakes at Trader Joe's. I tried the tiramisu torte and the black forest torte. I preferred the black forest, but it's low on cherries. You may want to consider serving with some canned or fresh cherries or some other fruit sauce or compote. The tiramisu is tasty, but the cream left a funny, sticky feeling on the roof of my mouth. Both of these are sickeningly sweet, creamy, cakey, and gooey, just as you'd want a decadant dessert to be. While neither are as good as baked from scratch, these will do in a dessert pinch.
These cakes come frozen and the box instructions recommend thawing for 4 hours in the fridge or 2 hours at room temperature. I did one in the fridge and found that 4 hours wasn't quite long enough. Two hours on the countertop was fine for the other cake. These are both a little messy to serve, especially the black forest. The little chocolate shavings fall off the top and get all over the place. While you can take a slice and put the rest in a large ziploc bag and back in the fridge, the messiness may put you off that strategy. (But they will keep well in the fridge for a few days.) I suspect these are best eaten in one sitting, like at the end of a dinner party.
They do not try to mask themselves as health food. They are full of dairy, sugar, and fat. But no gluten.
I bought these at Trader Joe's and I haven't seen them anyplace else. They are imported from Italy. Trader Joe's rotates its stock often so before you make a trip specifically for one of these cakes, give them a call.
(Click on the photo to see the larger size on flickr.)
glutino chocolate dreams
 Glutino Chocolate Dreams -- I'd say they're more like chocolate passing thoughts. When I imagine chocolate dreams, I imagine much richer, thicker, higher-quality chocolate. But these are good little cookes. The cookie is dry and best when dipped in a glass of milk or cup of tea. The frosting in the middle is super-sweet, like the filling in some of those generic sandwich-cream cookies that it seems like you always had a grandma or older aunt who would buy them instead of Oreos.
Ingredients include corn starch, soy flour, and cocoa. The box warns they may contain traces of tree nuts and milk. (But what doesn't give a warning like that nowadays?)
I found them at Whole Foods and they can be purchased from a number of online merchants.
They come in little packages, 2 to a pack. But note that the nutritional information says that a serving size is 3 cookies. You have to eat a smaller serving size or a larger one, because no one in their right mind would open one of those little packs and eat just one cookie from it. Unless you are a parent who puts just one pack in your kid's lunchbox and doesn't let her read the serving size information. These would be handy for a road-trip, too, because you can easily put a pack or two in your day bag.
03 November 2007
pumpkin seeds

If you carved a pumpkin this week, then you had a bunch of pumpkin seeds laying around afterward. I've always loved roasting them for a post-carving snack.
I wanted to say a little more than "spread on tray and put in oven" for this post, so I turned to Wikipedia for some pumpkin seed info. Pumpkin seeds are a good source of stuff that's good for us: iron, zinc, essential fatty acids, potassium, and magnesium. There's also new research showing that they are high in tryptophan. So when you're feeling jittery from eating all that trick-or-treating loot, down a handful of pumpkin seeds to help you relax.
There are various "favorite" ways for preparing pumpkin seeds. I separated mine from the pulp and rinsed them in a colander. Then I forgot about them and left them to dry overnight in the sink. The next morning I spread them on a foil-lined baking sheet and lightly salted them. I baked them at 350 for about 15 minutes. They were crispy and light brown on the outside and just a little chewy on the inside.
First I ate them by the handful while they were still warm from the oven. Later in the day I mixed some with sweetened dried cranberries for a sweet and salty snack. Then I topped a green salad with the last of them.
Why do I only do this once or twice a year? I only roast them when I've cut up a pumpkin for some reason. It's just not the same to buy them from the store. I like to get my hands in the pumpkin guts.

This is my entry for Weekend Herb Blogging. This is a weekly event that collects recipes for herbs and vegetables, sponsored by Kalyn's Kitchen. This week it's being hosted by Kalyn herself, so head over on Monday to check out the weekly recap of recipes. Kalyn has begun the countdown to Thanksgiving... speaking of tryptophan.
26 October 2007
cranberry zucchini muffins
Are those silicon baking things supposed to steam and smell like melting plastic about 5 minutes after you put them in the oven? I didn't think so. But nothing appeared to be melting or burning, so I decided to let the baking run its course.
I'm still getting some good, locally grown, inexpensive summer squash, so why not one more go-round with the zucchini quick bread recipe I tried a few months ago? I used dried cranberries this time and decided to go with muffin form instead of a loaf of bread.
I think that muffins are great for this recipe and the cranberries are better than the apricots I used last time. Instead of a dense, rich bread, I have tasty little pops of muffiny goodness. They are moist, but not too moist. And they aren't too sweet, which makes them perfect for breakfast. They aren't terribly attractive though. I think that's a trade-off when dealing with homemade muffins. They taste 1,000 times better than something you'll buy in a package, but let's say they, um, have rustic charm in the looks department.
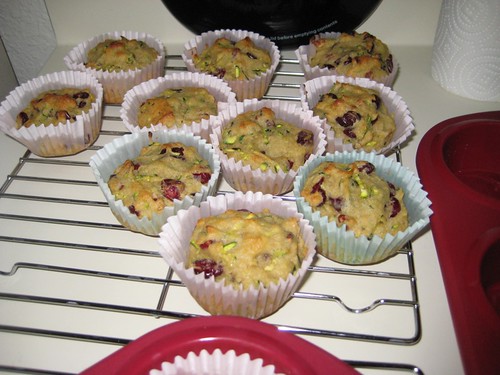
The steaming muffin pans seemed to not be a problem. The muffins taste fine. And if they are poisonous, well, then at least I'll go with a tummy full of yummy muffins.
I'm still getting some good, locally grown, inexpensive summer squash, so why not one more go-round with the zucchini quick bread recipe I tried a few months ago? I used dried cranberries this time and decided to go with muffin form instead of a loaf of bread.
2 eggs
1/2 cup honey
1/2 cup butter, melted, or oil (I used canola oil)
1 tsp vanilla
1 1/2 cups zucchini, peeled and shredded
1 cup yellow raisins (I used dried cranberries)
1/2 cup plain nuts, chopped (I used pecans)
1 cup rice flour (I used white rice flour)
1/2 cup millet flour
2 tsp baking powder
1 1/2 tsp xanthan gum
2 tsp cinnamon
1/2 tsp salt
1 envelope (.25 oz or 7 g) gelatin
Preheat oven to 350. [Place cupcake liners in muffin pans.] Beat eggs. Add honey, butter or oil, vanilla, grated zucchini, [dried cranberries], and nuts to beaten eggs. Sift together flours, baking powder, xanthan gum, cinnamon, salt, and gelatin. Fold dry ingredients into liquids--this will keep it light (stirring it all gently works too). Pour into prepared pans. Bake for about [15] minutes. (Info in brackets is what I modified for making muffins instead of the quick bread this is the recipe for in the book The Best-Ever Wheat- and Gluten-Free Baking Book.)
I think that muffins are great for this recipe and the cranberries are better than the apricots I used last time. Instead of a dense, rich bread, I have tasty little pops of muffiny goodness. They are moist, but not too moist. And they aren't too sweet, which makes them perfect for breakfast. They aren't terribly attractive though. I think that's a trade-off when dealing with homemade muffins. They taste 1,000 times better than something you'll buy in a package, but let's say they, um, have rustic charm in the looks department.
The steaming muffin pans seemed to not be a problem. The muffins taste fine. And if they are poisonous, well, then at least I'll go with a tummy full of yummy muffins.
24 October 2007
pierogi part 2
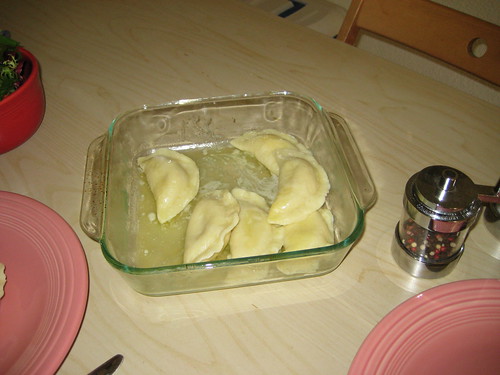
The pierogi were a success! (See also pierogi part 1.)
We used the Homade Pasta recipe in Bette Hagman's The Gluten-Free Gourmet Revised Edition. This is the basic recipe. For making pierogi or raviolli, triple it. We found that we got about 3 dozen pierogi.
Ingredients:
1/3 cup Tapioca Flour
1/3 cup Cornstarch
2 Tb Potato Starch
1/2 tsp Sea Salt
1 Tb Xanthan Gum
2 large Eggs
1 Tb Vegetable Oil
Combine flours, salt, and xanthan gum. Beat eggs lightly and add oil. Pour egg mixture into flour mixture and stir. This will feel much like pastry dough. Work together into a firm ball. Knead a minute or two.
The recipe in the book and online give further instructions depending on the different kinds of pastas you could make. For the purpose of making pierogi, you'll want to work with small handfuls of dough. Roll it out, with just the minimum amount of flour necessary to keep it from sticking. Too much flour will toughen the dough and keep it from being as sticky as it needs to be. Roll it out to about 1/8 of an inch. Use a biscuit cutter or glass or jar lip to cut circles about 4 inches in diameter. Keep rolling dough until you've made as many circles as it will yield.
Use your fingertips to wet the edges of each circle. Let the water sit for few minutes, making a nice, sticky edge. (By the time you get to the last circle, the first one should be just sticky enough. Spoon some filling into the center of each circle. Fold the circle in half, pinching and crimping the edges until they are sealed tight.
Any that you are cooking right away, set aside. Any that you will be freezing, place on a cookie sheet and put them in the freezer until they are dry. Once they're no longer sticky you can put them in freezer bags.
To cook, place pierogi in a large pot of salted boiling water for 10 to 15 minutes (and hope you sealed them tightly enough!). Remove with a slotted spoon. Serve with hot melted butter.
Our three different fillings were delicious. The potato and cheese tasted just like I remember them from the pre-gf days. The squash ones were a little like pumpkin empanadas. And the rice and sausage were like... something yummy stuffed with rice and sausage.
20 October 2007
pierogi part 1
My mom and I are going to make gluten-free pierogi! (We hope Babci doesn't mind us using an untraditional recipe. I'm sure she'd want me to be eating pierogi in any form that I can.)
We went back and forth through cookbooks, wondering if we should use a gf ravioli recipe for the dough or if we should use a more traditional pierogi recipe and substitute a gf flour mix. My mom couldn't remember the exact recipe her grandmother used off the top of her head, except to know that the recipes we were finding did not use any potato in the dough and she knows Babci used potato. We decided to use one of the pasta recipes in Bette Hagman's Gluten-Free Gourmet Revised Edition. It at least uses potato starch. (And if our pierogi are a tad lighter and healthier than the old-fashioned kind, then I guess we can just eat more of them!)
This morning we worked on fillings. We will make some with a traditional potato-cheese filling. I boiled and mashed a pound of potatoes and mixed in some farmers' cheese to taste. I also added a small bit of sauteed onions and a dash of pepper. (The cheese was salty enough; I didn't want to add more.)
We will also make some with untraditional fillings. While looking for pierogi recipes in The Joy of Cooking I found a winter squash ravioli stuffing. Yum! I had two small delicata squashes, so I baked them and mashed them. I added a small amount of the farmers' cheese and dashes of salt, pepper, and nutmeg. You don't want your pierogi filling to be too moist and mushy so I may need to add some flour or starch to thicken up the otherwise watery squash.
And off the cuff we're thinking of dicing some Aidell's mango sausage and mixing it up with some rice and melty sharp cheddar cheese.
Pierogi can easily take a whole weekend to make, especially if you're making the tradional seemingly thousands of them (enough to freeze and reheat 3 meals a day all winter long, plus have a huge feast of them at Christmas time). We made the potato and squash fillings this morning and will prepare the sausage and rice filling just before we start on the dough (the sausage is pre-cooked). Rolling out the dough and making all those little circles takes forever, and then it takes forever again to fill them and seal them. (That's why you have an army of children work on them, assembly-line style.)
This evening my kitchen will be a pierogi factory, with just my mom and I as the workers. I remember this being quite exhausting as a child. If you don't see Part 2 appear in a few days, send for help.
(P.S. By "traditional" I mean what my babci would have done, or my memory of what she did. Your babci may have completely different recipes and techniques.)
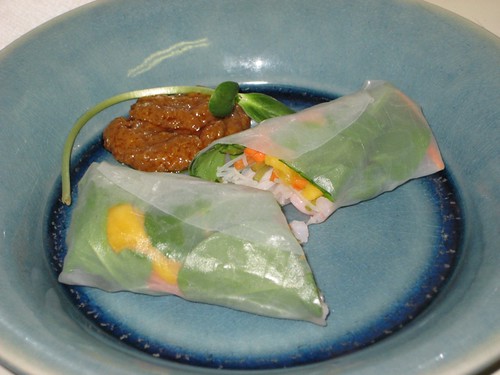
spring rolls
My mom's in town for a week, so I had a helper for my first attempt at making spring rolls. We are having warm sunny weather during the days, so cool salad-type lunches are in order.
You can buy spring roll wrappers in the Asian foods aisle of most major grocery stores. I also bought stick noodles for the filling and Thai Kitchen peanut satay sauce for dipping. (Thai Kitchen labels their gluten-free products clearly.)
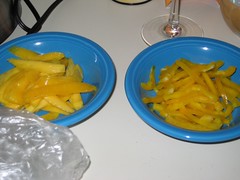
First we prepared all the fillings. We cooked the noodles so they'd have a few minutes to cool and get sticky while we got the other fillings ready. We had lettuce, sunflower sprouts, carrots (purchased pre-sliced for ease), mango, yellow pepper, and some tiny shrimp for my mom. You can pretty much take any fruits or veggies out of the crisper drawer and slice them up. It's a good way to clean out small amounts of something before it goes bad. (I was hoping to add some mint and cilantro, but they expired. It's the risk you take when dealing with fresh food sometimes.)
We decided to make one spring roll at a time, because it takes up a lot of counterspace, more than I really have in my kitchen. I filled a square glass baking dish with warm water and submerged my spring roll wrapper for about 20 seconds. Then I placed it on a clean, damp tea towel (which I had previously placed over the cutting board I was using as the wrapping work station). I pulled up the edges of the towel and blotted the wrapper until it was slightly sticky. Then I put my fillings in.
It's best to keep the fillings as log-shaped as possible, and don't let them get too close to the edges.
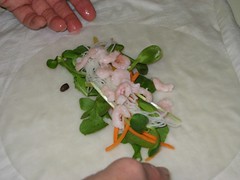
Once the fillings are in place, bring up the bottom of the wrapper, trying to keep the fillings as tight as possible before letting the wrapper seal with the top part. Fold in the left and right edges, then roll up tight. You'll find the wrappers can take quite a bit of rolling abuse, as long as you don't try to unseal and unroll them.
Our first ones were sort of loose and fillings spilled out on the plates when we sliced them in two. Our second ones were much tighter. You really can pack a lot in them.
These can also be deep-fried. I haven't tried that yet, but looking forward to giving it a whirl!
It's fun to make these, and I bet it's a good project for kids, but it's a lot of work for basically a salad. I'm sure I'll get faster the more I make them.

This is my entry for Weekend Herb Blogging. This is a weekly event that collects recipes for herbs and vegetables, sponsored by Kalyn's Kitchen. This week it's being hosted by The Well-Seasoned Cook, so head over there on Monday to check out the weekly recap of recipes.
You can buy spring roll wrappers in the Asian foods aisle of most major grocery stores. I also bought stick noodles for the filling and Thai Kitchen peanut satay sauce for dipping. (Thai Kitchen labels their gluten-free products clearly.)
First we prepared all the fillings. We cooked the noodles so they'd have a few minutes to cool and get sticky while we got the other fillings ready. We had lettuce, sunflower sprouts, carrots (purchased pre-sliced for ease), mango, yellow pepper, and some tiny shrimp for my mom. You can pretty much take any fruits or veggies out of the crisper drawer and slice them up. It's a good way to clean out small amounts of something before it goes bad. (I was hoping to add some mint and cilantro, but they expired. It's the risk you take when dealing with fresh food sometimes.)
We decided to make one spring roll at a time, because it takes up a lot of counterspace, more than I really have in my kitchen. I filled a square glass baking dish with warm water and submerged my spring roll wrapper for about 20 seconds. Then I placed it on a clean, damp tea towel (which I had previously placed over the cutting board I was using as the wrapping work station). I pulled up the edges of the towel and blotted the wrapper until it was slightly sticky. Then I put my fillings in.
It's best to keep the fillings as log-shaped as possible, and don't let them get too close to the edges.
Once the fillings are in place, bring up the bottom of the wrapper, trying to keep the fillings as tight as possible before letting the wrapper seal with the top part. Fold in the left and right edges, then roll up tight. You'll find the wrappers can take quite a bit of rolling abuse, as long as you don't try to unseal and unroll them.
Our first ones were sort of loose and fillings spilled out on the plates when we sliced them in two. Our second ones were much tighter. You really can pack a lot in them.
These can also be deep-fried. I haven't tried that yet, but looking forward to giving it a whirl!
It's fun to make these, and I bet it's a good project for kids, but it's a lot of work for basically a salad. I'm sure I'll get faster the more I make them.
This is my entry for Weekend Herb Blogging. This is a weekly event that collects recipes for herbs and vegetables, sponsored by Kalyn's Kitchen. This week it's being hosted by The Well-Seasoned Cook, so head over there on Monday to check out the weekly recap of recipes.
07 October 2007
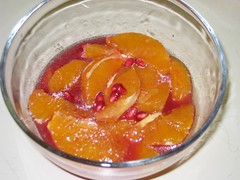
valencia oranges with pomegranate vinaigrette

I've had very little experience with pomegranates other than enjoying the Persephone myth. I think that until I moved to California (at the age of 25) I assumed they were some sort of exotic Ancient Greek food that wasn't even around anymore. (We just didn't have pomegranates in Rhode Island.) But they've become all the rage recently because of their healthy juice. I tried it once, a couple years ago, and wasn't that impressed. When I saw that pomegranates were coming in season I decided to give them another chance. I'm supposed to be trying new things--or revisiting and retrying old things.
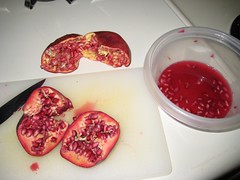
I got 2 pomegranates in my Planet Organics order this week and they've been sitting on the counter for the last few, days waiting for me to decide their fate. I browsed through some books and the Melissa's website. Finally I settled on juicing them for a syrup. I had grandiose ideas of making buckwheat pancakes with pomegranate syrup one morning. Yeah, that didn't happen. I drink coffee and eat a banana. I don't make breakfast.
Per the directions in Melissa's Great Book of Produce, I rolled the pomegranates on the hard countertop, listening for the popping juice sacs. Then I tried to make a little slit in the first one. Juice spurted out all over. I managed to get most of it into the dish. I squeezed and squeezed, and juice was dribbling out. So I made the slit bigger. More juice. But eventually I squeezed the poor thing to death and it ripped apart in my hands. Heh, seeds. I nibbled on a few. The ones that still had red stuff around them were sweet, like little candies. Since some seeds fell in my juice, and I didn't feel like straining or scooping them out, and the pomegranite didn't yield as much juice as I thought it would, I changed my mind to making a vinaigrette. I've made a raspberry vinaigrette for citrus salad before and I had some citrus on hand, so it was a perfect new plan. The seeds would be a nice little crunch.
The skin of the second pomegranate started to tear as I was rolling it on the countertop so I had to quit doing that and try to squeeze out as much juice as possible, before all the juice sacs were actually broken. So, not as much juice, but more sweet seeds.
After juicing pomegranates, your kitchen will look sort of like a crime scene.
I whisked the juice with some champagne vinegar and olive oil. It turns out the only citrus I had were valencia oranges. (I usually like to make a citrus salad a little further into the winter, with a mix of blood oranges, tangerines, ruby red grapefruits, ie, more of a variety.) I sliced the peels off, then separated each segment.

I had planned to have this for dessert, but I changed my mind and ate it as a snack before I started cooking dinner. It was so sweet and tasty.
I saved the orange peels and later in the evening, after I was done making and eating dinner, I simmered them on the stovetop with a cinnamon stick. Garlic smells great while it's cooking, but afterwards it needs to be eliminated. Orange and cinnamon is much more pleasant.
This is my entry for Weekend Herb Blogging. This is a weekly event that collects recipes for herbs and vegetables, sponsored by Kalyn's Kitchen. This week it's being hosted by Cook (almost) Anything, so head over there on Monday to check out the weekly recap of recipes.
(I got a new camera this week. Thanks Mike! Clicking on any photo will take you to the full-size image on flickr.)
03 October 2007
enjoy life soft baked double chocolate brownie cookies
I have a backlog of product reviews I've been working on and this morning I made my monthly trip to Whole Foods to stock up on gluten-free cookies and crackers. They had some of my favorites on sale and they had some new things I hadn't tried yet. So now I have a cupboard full of new foods to eat and review.
Today's victim: Soft baked double chocolate brownie cookies from Enjoy Life. Phew, what a name! With all those descriptors, you'd expect the taste to be, well, chocolatey. (More on that in a second.)
Enjoy Life does a great job of package labeling, letting you know exactly what isn't in their products. They pride themselves on allergen-free foods. And that's good. More companies should practice better labeling. These cookies can be eaten by nearly everyone (except those with a chocolate allergy). They are vegan and kosher. They're free of dairy, wheat, peanuts, tree nuts, eggs, soy, fish, shellfish, casein, potato, sesame and sulfites. (You wouldn't expect most of those things to be in a cookie anyway, so there's a little bit of alarmist jargon going on here.)
You're right to be suspicious and wonder what's in them, if they're absent of all that good stuff. There is cocoa and sugar, but not nearly enough of either. The chocolate chips don't taste like chocolate at all. You know how stuff sweetened with fruit juice just doesn't taste the same as stuff sweetened with sugar? These are sweetened with a lot more fruit juice than sugar and that's evident in the taste. And wouldn't you expect double chocolate brownie cookies to be dark brown, like brownies? They are tan. A tan brownie cookie should have been my first red flag. I thought maybe the photography on the box was just not very good.
The texture is decent. Not Chewy Chips Ahoy soft, but softer and chewier than I expected.
On a green note, they are packaged in a cardboard box, a plastic bag, and a plastic tray. And all the cookies fell out of the tray and stuck together anyway, so the tray is evidently useless.
I just didn't find these cookies satisfying. If you grew up eating low-sugar health food stuff and don't know an Oreo from a Keebler Elf, then you might enjoy these cookies. If you're on an extremely limited diet and have few snack food choices, then these might do it for you. But if you are a card-carrying junk food junkie who is newly adapting to the gluten-free diet, pass these by.
Today's victim: Soft baked double chocolate brownie cookies from Enjoy Life.
 Phew, what a name! With all those descriptors, you'd expect the taste to be, well, chocolatey. (More on that in a second.)
Enjoy Life does a great job of package labeling, letting you know exactly what isn't in their products. They pride themselves on allergen-free foods. And that's good. More companies should practice better labeling. These cookies can be eaten by nearly everyone (except those with a chocolate allergy). They are vegan and kosher. They're free of dairy, wheat, peanuts, tree nuts, eggs, soy, fish, shellfish, casein, potato, sesame and sulfites. (You wouldn't expect most of those things to be in a cookie anyway, so there's a little bit of alarmist jargon going on here.)
You're right to be suspicious and wonder what's in them, if they're absent of all that good stuff. There is cocoa and sugar, but not nearly enough of either. The chocolate chips don't taste like chocolate at all. You know how stuff sweetened with fruit juice just doesn't taste the same as stuff sweetened with sugar? These are sweetened with a lot more fruit juice than sugar and that's evident in the taste. And wouldn't you expect double chocolate brownie cookies to be dark brown, like brownies? They are tan. A tan brownie cookie should have been my first red flag. I thought maybe the photography on the box was just not very good.
The texture is decent. Not Chewy Chips Ahoy soft, but softer and chewier than I expected.
On a green note, they are packaged in a cardboard box, a plastic bag, and a plastic tray. And all the cookies fell out of the tray and stuck together anyway, so the tray is evidently useless.
I just didn't find these cookies satisfying. If you grew up eating low-sugar health food stuff and don't know an Oreo from a Keebler Elf, then you might enjoy these cookies. If you're on an extremely limited diet and have few snack food choices, then these might do it for you. But if you are a card-carrying junk food junkie who is newly adapting to the gluten-free diet, pass these by.
roasting acorn squash and baking bread
Tonight I made squash inspired by Thyme for Cooking. In looking at her photo, I see that I sliced my squash in the wrong direction. I don't think it made a difference. Also, I didn't have any dried rosemary but dried thyme was a tasty substitute. My squash was from Planet Organics. I used half a squash, since dinner was just for me tonight. On the side I heated up some leftover rice and shelled edammame.
While my squash slices were in the oven I went over my list for this week's Planet Organics delivery. I've decided to reduce the number of plain old apples and oranges and add some splurge items. Hopefully, if they're not sold out, I'm getting some first-of-the-season pomegranates. I'd also like some Mt. Tam cheese and basil and tomatoes.
I'm baking bread this evening. I'm putting the elements in order for the perfect storm of grilled cheese sandwiches. However, as I'm typing this, I can smell my bread burning slightly. For the first time ever, it has flowed over the top of the bread making bucket. I'm not sure if I should unplug it, or maybe just scoop off the overflow, or just let it go. Currently I'm opting for letting it go and seeing what happens.
01 October 2007
squash, rice, veggies & tofu: convenient and in one pan
I read on the back of my Imagine Creamy Butternut Squash Soup carton that it should be poured over rice for a delicious side dish. I started thinking that if it can be poured over rice, then it can be poured over rice + other stuff to make a curry-like concoction.
First I quartered and cooked 2 purple potatoes in a small saucepan until soft. (I was cooking just for me tonight, so a small saucepan was plenty.) When cooked I let them sit in a strainer for a few minutes in the sink. In the same small saucepan I mixed in some soup, leftover rice, and cubed tofu. I added some garum masala, salt, fresh ground black pepper, a pinch of crushed red pepper and a dash of cumin. (All the spices were "to taste" and I added more of some things as the cooking went on.) I kept this on medium on the stovetop for a little bit. Then I put the potatoes back in and added some red pepper slices and string beans (both from farmers' market this morning). When it started simmering I turned the burner down to low. I just let it sit and kept tasting until everything seemed hot enough. I wanted the peppers and beans to be warm but crisp.

I don't know a lot about Indian spices and cooking. It didn't taste complete and I'm not sure what else I should have done. It was pretty tasty but something definitely seemed to be missing.
I'm not a huge soup fan, but I started eating some of the Imagine soups last winter when Mike was away from home and I was lonely and just wanted easy, fast, warm food. The gluten-free ones say so right on the back of the carton. You have to watch out for cartons and cans of soup. Often wheat flour is used as a thickener. What's so stupid is at my Safeway they don't have the Imagine soups on the same shelf as all the other soups. You have to go down the health food/gourmet aisle. Why must they segregate the foods like that?
(Sorry for the poor photography. I am without the good camera for a bit.)
30 September 2007
a curious little eggplant
I was going to name this post something along the lines of "farmers' market is a chore" because it really felt like one this morning. I didn't wake up early enough to beat the crowds so by the time I got there it was hot and crowded. I just wanted flowers and tamales. In and out, quick quick. The line at the tamale stand was too long so I went to the flower guy first. I picked up some beautiful marigolds. Then the line at the tamale stand was three times as long! So I threw my hands up and begrudgingly settled for some vegetables that I wouldn't have to stand in line for. I know the older me will thank the younger me 30 years from now for choosing vegetables over tamales. But the current me really, really wants to drown in hot cheese.
I don't want this to be a hippie-dippy post about lovingly and carefully selecting my organic vegetables, taking in the smells and scents of fresh herbs and all that crap. This was veggie purchasing in the trenches. A little old man and I were elbowing each other over finding the best red peppers. I was frowning at all the tomatoes. Lots of stuff seemed slightly passed its prime. Someone started to hold up the line discussing the freshness of the eggs. This just wasn't a relaxing activity.
On an impulse, just before I handed over my red peppers for weighing, I grabbed a curious little eggplant. I think it's a kind of Indian eggplant, based on this information from Evergreen Seeds. I don't know what to do with it, but I'm enjoying thinking about it and looking at it. I can't find much information online about how to cook it. Should I stuff it? Slice it up into curry?

No Weekend Herb Blogging for me this week. My activities in the kitchen have been nothing to write home about. But check out Kuchenlatein tomorrow for the weekly summary. Maybe my entry next week will be whatever I end up doing with my little eggplant.
24 September 2007
chili and cornbread

This is a meal that Mike perfected back in his bachelor days. He made it with pork, and while I like the pork, he also developed this potato version that I love. It's a hearty meal, perfect for chilly weather because it warms up the whole house. It feeds several people at once, or the two of us for a week.
1 lb potatoes
1 15-oz. can each of black beans, kidney beans, and pinto beans (or whatever beans you prefer)
1 14.5-oz. can diced tomatoes
1 8-oz. can tomato sauce
1 1-oz. block of baker's chocolate
1 package Carroll Shelby's Chili Kit (Look for the package that looks like a tiny paper bag. It's sometimes on the Mexican-food/taco seasoning shelf, other times with soup mixes.)
Step 1
Quarter the potatoes so they are about bite-sized. Place on a baking sheet and roast at 375 for about 30 minutes. They want to be slightly under-cooked.
Meaty alternatives to the potatoes are slices of pork, browned, or a package of Aidells Habanero and Green Chili Sausage, sliced. (The sausage is precooked so it doesn't need to be browned before using.
While the potatoes are in the oven, open the cans of beans and put them in a colander. Rinse them and leave them in the sink to drain.
Step 2
In a large pot, combine potatoes, beans, tomatoes, tomato sauce, 1 can of water, from the 8-oz. tomato sauce can, chili mix (mix and spices only; save the masa flour and salt for later), and baker's chocolate. (The spice package will warn you that it's super hot n spicy, but it's not. This is pretty tame, heat-wise.) Bring to a boil, then cover and reduce heat to a simmer. Keep simmering for at least 30 minutes. During this time, test-taste to see if salt is needed. Also, for thicker chili add some masa. This can simmer or be kept warm for several hours, until you're actually ready to eat.

Step 3
When you're about 30 to 45 minutes away from being ready to eat, make the cornbread. I use the Orange Cornbread recipe from Bette Hagman's The Gluten-Free Gourmet.
2 cups corn flour (cornmeal is also okay)
2 Tbs sugar
4 tsp baking powder
1/2 tsp salt
1 cup milk
3 eggs, beaten
1/3 cup vegetable oil
2 tsp grated orange peel
Preheat oven to 400. Grease a 9 by 9 square baking pan.
In mixing bowl, combine corn flour, sugar, baking powder, and salt. Stir in milk, eggs, oil, and orange peel until smooth. Do not overbeat.
Pour into the prepared pan. Bake for 20 to 25 minutes.
If you want sangria, then you should have started 12 to 24 hours earlier, when you stuff a jar with orange slices and red wine and a pinch or two of sugar. Let it stew in the fridge all day or overnight.
You can start drinking sangria now, because all the work is finished. Be sure to serve it with a splash of something fizzy, like sparkling water.
And thanks to the sangria, I've now sort of lost track of the rest of the post. We like to put a piece of cornbread in the bottom of a bowl and put the chili over it. Then top with shredded cheddar cheese, a dollop of sour cream, and some fresh cilantro.
This was our first chili of the season and it was spectacular. It's a little earlier than we usually make it, being only the first day of fall, and it's almost too warm outside, but we really wanted it this weekend.
22 September 2007
eggplant with basil and feta
 This recipe is inspired by the Crispy Eggplant with Spicy Tomato-Feta Cheese Sauce in the book Vegetarian Cooking for Today. We've modified it quite a bit for our tastes. It's the recipe that convinced Mike several years ago, after we both read Fast Food Nation, that it's not so bad to cut down on meats. It's also the recipe I wanted to make a couple weeks ago when I had an eggplant but ended up without basil.
eggplant
1 egg
small bit of milk
pototo starch
bread crumbs
tomato sauce
crushed red pepper
fresh basil
feta cheese
I got a medium eggplant from my Planet Organics delivery on Thursday. Peel it and slice it into rectangles, about 1 inch by 2 inch by 3 inch. Let the pieces sit on a plate, salted, for about 10 minutes to draw out some of the moisture. Pat dry with paper towels. Bread the pieces by dipping in potato starch, an egg-milk mixture, and finally bread crumbs. (I use Gluten-Free Pantry Herbed Crumb Coating. I hate the breading process--it seems to take forever. A little trick I have is to ask Mike to do it for me.) Place breaded pieces on a baking sheet and bake at 400 degrees for 25 to 30 minutes, until the outsides are crispy and the scent of herbed bread crumbs is intoxicating.
While the eggplant is baking, heat up some of your favorite store-bought or homemade tomato sauce in a small sauce pan, adding a pinch of crushed red pepper. Wash and pat dry some basil leaves. Sometimes I slice them into attractive little shreds. Get the pack of feta cheese from the fridge. Place eggplant pieces on plate, spoon sauce over them, then top with basil and crumbled feta.
It's a very satisfying meal, combining some of our favorite flavors. It's warm and filling for cool weather, but if you can get good fresh basil you have great summery flavor. And everything is better when it's topped with feta cheese.
This is my first entry for Weekend Herb Blogging. This is a weekly event that collects recipes for herbs and vegetables, sponsored by Kalyn's Kitchen. This week it's being hosted by Once Upon a Tart, so head over there on Monday to check out the weekly recap of recipes.
21 September 2007
steak salad
1. Make a green salad with your favorite veggies.
2. Top with slices of cold steak leftover from the restaurant the night before.
Isn't that easy?
People who've known me forever might be saying, "Stephanie and steak?" I don't really like red meat and I average about one serving a year. But the menu changed at our favorite steakhouse and their totally delicious chicken dish isn't on it anymore. I'm not a huge fan of fish either. So I found the least steak-tasting steak dish I could find, and it was pretty good. Skewers with onions and red peppers. And it was actually even better on my salad the next night. Maybe I can increase to 3 or 4 servings of red meat a year.
Has anyone else found that the gluten-free diet leaves you craving foods you didn't usually like or eat before? I remember a few weeks into the diet realizing that I wanted to eat a lot more meat than usual. My body definitely felt a void. In the last few years I've expanded to Thai food, Indian food, and some sushi. I eat tofu and broccoli, more because they're good for me than because I like them, but that's part of what it means to be a healthy adult. I'm still a picky eater (still hate eggs!) but I've come a long way from the kid who'd only eat mac 'n' cheese.
19 September 2007
cleaning-out-the-fridge stirfry
Today is grocery shopping day (although I'm putting it off until tomorrow) so last night was eat from the fridge night. Sometimes these forced creativity exercises are more successful than others. Last night's was a success!
Stirfry is theoritcally the sort of dish you can throw almost anything into, but we have some favorites that we always use. We didn't have all those favorites on hand last night though so I had to improvise.
I diced some super-frim tofu and sliced some red pepper. I stirfried the tofu with garlic in peanut oil. I added the red pepper slices toward the end just to warm them up. Meanwhile Mike heated up Monday night's leftover rice in the microwave. We took 2 big bowls and filled them with the rice, tofu, and red peppers, and mixed in the last of the Chinese peanut sauce. Voila! A quick, filling, delicious dinner of leftovers.
tandoori chicken with yogurt sauce
I first mentioned this recipe from Everyday Food a few weeks ago because it inspired the apple yogurt slaw I like to serve with other dishes. Sometimes though we like to do this complete recipe.
I like to use 2 boneless chicken breasts instead, for faster, easier cooking. Also, I use whatever apples I have on-hand and I like to add lime juice to the apple slaw. And we always make rice for the side.
We had this on Sunday. Last night was marinated, grilled pork chops. Tomorrow we're going to a steakhouse for dinner. So tonight it's tofu, veggies, and water.
1 cup plain low-fat yogurt
2 garlic cloves, minced
1 teaspoon ground turmeric
1 teaspoon ground ginger
Coarse salt and ground pepper
4 bone-in, skinless chicken breasts halves (10 to 12 ounces each)
2 Granny Smith apples
1 tablespoon chopped fresh cilantro
1. Preheat oven to 475°. In a large bowl, mix together 1/2 cup yogurt, garlic, turmeric, ginger, 2 teaspoons salt, and 1/4 teaspoon pepper. Add chicken; turn to coat.
2. Transfer chicken to a rimmed baking sheet. Roast until an instant-read thermometer inserted in thickest part of breast (avoiding bone) registers 160°, 25 to 30 minutes.
3. Meanwhile, peel apple; coarsely grate into a medium bowl. Add cilantro and remaining 1/2 cup yogurt; season with salt and pepper. Serve sauce alongside chicken, with rice, if desired.
I like to use 2 boneless chicken breasts instead, for faster, easier cooking. Also, I use whatever apples I have on-hand and I like to add lime juice to the apple slaw. And we always make rice for the side.
We had this on Sunday. Last night was marinated, grilled pork chops. Tomorrow we're going to a steakhouse for dinner. So tonight it's tofu, veggies, and water.
17 September 2007
Bob's Red Mill Hearty Whole Grain Bread
Getting enough whole grains on the gluten-free diet is a concern of mine. I can't just walk into any supermarket and buy whole grain breads and cereals. Everyone thinks of wheat when they think of whole grains. So when I'm eating grains, how do I know they're the whole grains that are good for me?
 When I noticed Bob's Red Mill Gluten-Free Hearty Whole Grain Bread mix I decided to give it a try. I like his Wonderful Sandwich Bread. Bob's bread mixes seem to work better than any others in my bread machine. I was placing an order anyway so decided to go for it.
I was skeptical when I first openned the package. It smelled funny. I checked the ingredients, and they include onion powder. They also include cocoa, which accounts for the darkness of the mix. I put my trust in Bob and threw everything in my bread machine. (You need water, eggs, and cider vinegar. The mix comes with yeast.)
I was concerned during the mixing and kneading because the dough stayed very wet and blobby, not forming the "dough ball" it's supposed to. And once it entered the baking cycle it didn't smell as pleasing as baked bread is supposed to smell.
The bread is actually pretty good. It's moist, not crumbly. It's a savory bread and with all the caraway seed it tastes very much like rye bread. I've been enjoying it simply with butter alongside all my dinners. It seem like such a luxury to have a slice of bread with butter every day!
16 September 2007
carrot cake

I was looking forward to the abundance of carrots in my produce delivery this week because for some reason I had a hankerin' for carrot cake. I can't remember the last time I ate carrot cake. It's not something I usually crave, but I have always loved the cream cheese icing.
I found a recipe in one of my gluten-free baking books and I was so diligent about making sure I had all the ingredients on my shopping list when I went to the store earlier this week. It uses some exotic flours, like almond meal and teff, which I have in my pantry. It calls for fava bean flour but I figured I could substitute with soy flour, which is easier to get on short notice. I cleared a few hours yesterday afternoon so I could hunker down in the kitchen. Opened my book and... I didn't have enough eggs. The recipe calls for 4 and I only had 3. Shoot.
I looked through 6 of my cooking and baking books. I could always do a Fanny Farmer and substitute the regular flour with my gf flour mix. The Fanny Farmer calls for a lot of ingredients though. Better Homes and Gardens calls for 4 eggs. This one calls for too many eggs. That one uses ingredients I don't have on hand. I was ready to give up hope.
 Then I cracked open a book I hadn't used before. Some friends from New Zealand gave us a cookbook as a wedding present, Edmonds Classics: New Zealanders' Favourite Recipes. Much like the Betty Crocker cookbooks of yesteryear (which I love and have several from the 60s), it centers around Edmonds brand baking soda and other specific brands of flour and other ingredients. It has all the kitsch of the Betty Crocker books, plus the added quaintness of being from New Zealand.
 Not only does the Edmonds carrot cake recipe use only 3 eggs, but it uses two other elements I was sad to give up if I had to use a recipe other than the one I originally wanted to use: pineapple and a bundt pan. Pineapples and bundt pans are so fancy! They turn any old cake into a celebration.
3 eggs
1 cup sugar
3/4 cup Amco canola oil
2 cups Champion standard grade flour
1 tsp Edmonds baking powder
1 tsp Edmonds baking soda
1/2 tsp cinnamon
3 cups grated carrots
3/4 cup (225 g can) drained unsweetened crushed pineapple
1/2 cup chopped walnuts
1 tsp grated orange zest (optional)
Preheat oven to 180 C. Grease a deep 20 cm ring tin. Line base with baking paper. Beat together eggs and sugar for 5 minutes until thick. Add oil and beat for 1 minute. Sift flour, baking powder, baking soda and cinnamon. Combine carrot, pineapple, walnuts and orange zest. Fold into egg mixture. Fold in dry ingredients. Spoon mixture into prepared tin. Bake for 50 to 55 minutes or until a skewer inserted in the centre of the cake comes out clean. Leave in tin for 10 minutes before turning out onto a wire rack. When cold, spread with Cream Cheese Icing and garnish with orange zest and coconut.
The handy conversion table in the front of the book told me that 180 C is about 350 F. I did not check my bundt pan to see if it was anywhere near the size of a "20 cm ring tin." I figured it was roughly the same shape and I'd keep a close eye on it while it's in the oven.
For the New Zealand brand ingredients, obviously, use whatever counterparts you'd normally use. Of course I used Bob's Red Mill GF All-Purpose Baking Flour. I also used chopped pecans instead of walnuts because I like them better. I had the orange zest on hand so I added it. The can of pineapple I had said 227 grams, but after draining I assumed it would be close enough. (I reserved the juice in case I needed to make the batter moister.)
This was not a quick recipe for me. I'm slow in the kitchen. First I sifted together my dry ingredients, then I grated the carrots--by hand--and put the carrot mixture together. Then I turned on the oven, greased the pan (I didn't use paper because my pan is rounded), and got the eggs-sugar mixture going.
It was at this point I learned that you should not stick a rubber spatula into a KitchenAid Mixer while it's turned on. A kitchen angel must have been watching me because thankfully the damage was minimal. I think the worst part was the awful clanking sound as the whisk went awry and the bowl popped off the stand. Mike came running into the kitchen, certain I had chopped my fingers off or something. But not even any eggs-sugar had spilled! Mike was able to bend the whisk back into useable shape and I learned a very valuable lesson.
The rest of the mixing went quickly. The batter poured easily into my bundt pan and I put it in the oven. Somewhere between 40 and 45 minutes I checked it, and it was golden brown on top and the toothpick came out clean so I took it out. It slid from the pan gracefully and looked so pretty! Nice and golden brown.
This morning I made the icing. I used the cream cheese icing that goes with the carrot cake recipe I had planned on using in the Best-Ever Wheat- and Gluten-Free Baking Book. This book lists the ingredients for the icing but forgot the instructions.
3 oz (85 g) GF cream cheese, softened
2 cups (200 g) GF confectioners' sugar
2 Tbs (30 ml) milk
1 tsp almond flavoring or extract
I put the cream cheese, milk, and almond extract into my mixing bowl, started it up, and added the sugar gradually. This made a thick frosting. I wanted a thin, drizzly icing so I added quite a bit of water until I got the consistency I wanted.
As I was spooning the icing over the cake, Mike said, "Wow, that looks like a picture!" This cake is so pretty and so delicious that it might have to make an appearance at Thanksgiving or Christmas.
I think carrot cake is a recipe that works well with the gluten-free "translation" because the carrots and the pineapple make the batter very moist. Moisture is always a factor in gluten-free baking. I did not need to add the reserved pineapple juice--this batter was perfect.
This icing and cake combination is perfect. This is a very understated, mild carrot cake, and the small dose of super-sweet icing complements it perfectly. I guess it turned out to be serendipitous that I didn't have enough eggs for the recipe I first wanted to use, which has more spice and sugar. Mike's always claimed he hates carrot cake, but he likes this one.
**Dairy-free if you omit the cream cheese icing.
13 September 2007
chinese peanut sauce
All this produce from Planet Organics is sending me on searches for new recipes. When I first saw the price of their broccoli, I thought it was outrageous. But I decided to get some anyway. Holy cow! The amount of broccoli they give you is enormous. It's about 3 times the amount I usually buy for a week. Even though I don't love broccoli, it's good for me and I'm trying to eat more of it. And Mike loves it. So, since one of the points of getting this produce delivery is to introduce more fruits and veggies into our diets, surely I can find a pallatable way to serve all this broccoli. I add it to stir-fry, I add it to quinoa, I add it to rice. But I need more.
Recently I remembered that a couple years ago I'd made a peanut sauce that I really liked. But I hadn't liked the veggies I'd prepared with it so I put it out of my mind and never thought about making it again. Until yesterday. I found the recipe in my Moosewood and made Chinese peanut sauce and steamed broccoli for lunch. And it was delicious.
I used a chunky peanut butter for some crunchy texture. For soy sauce I use San-J Organic Tamari Wheat Free Soy Sauce.
This peanut sauce keeps in the fridge for a couple days and can be used on a variety of grilled or steamed vegetables. Or as a dipping sauce for spring rolls or fried tofu or something like that. Or even as a salad dressing. Add a little water to thin it to your needs.
Now we are down to about one serving of broccoli left. However our next produce delivery is today. We will have a broccoli surplus on our hands.
**Gotta go! My produce arrived as I was giving this post a final edit.**
Recently I remembered that a couple years ago I'd made a peanut sauce that I really liked. But I hadn't liked the veggies I'd prepared with it so I put it out of my mind and never thought about making it again. Until yesterday. I found the recipe in my Moosewood and made Chinese peanut sauce and steamed broccoli for lunch. And it was delicious.
1/2 cup good peanut butter
1/2 cup hot water
2 Tbs. soy sauce
2 Tbs. sugar
3 medium cloves garlic, minced
1 tsp. cider vinegar
1 to 2 Tbs minced fresh cilantro
cayenne, to taste
salt, to taste (if peanut butter is unsalted)
1) Place peanut butter in a small bowl. Add the hot water, and stir patiently with a spoon or a small whisk until uniformly mixed.
2) Stir in remaining ingredients and mix well. Cover tightly and refrigerate. Let come to room temperature before serving.
I used a chunky peanut butter for some crunchy texture. For soy sauce I use San-J Organic Tamari Wheat Free Soy Sauce.
This peanut sauce keeps in the fridge for a couple days and can be used on a variety of grilled or steamed vegetables. Or as a dipping sauce for spring rolls or fried tofu or something like that. Or even as a salad dressing. Add a little water to thin it to your needs.
Now we are down to about one serving of broccoli left. However our next produce delivery is today. We will have a broccoli surplus on our hands.
**Gotta go! My produce arrived as I was giving this post a final edit.**
11 September 2007
rosemary butter cookies
It's likely that we'll be moving within the next 6 months to a year and I've decided that my several years' worth of Martha Stewart magazines is baggage that doesn't need to move with me again. I've been going through them ripping out some of my favorite crafts and recipes. When this one caught my eye last night I said to myself, "Hmmm, I have about 1 tablespoon of fresh rosemary that needs to be used up soon. Why not?" I can't find this exact recipe online. I think it might actually have come from one of the Weddings magazines.
I used Bob's Red Mill GF All-Purpose Baking Flour. And I'm never certain when I should be sifting before measuring and when I should be sifting after. I chose after. And I used a Martha trick of stirring it with a whisk rather than pushing it through a sifter. In place of sanding sugar, which sounds very fancy-shmancy, I found that the Trader Joe's Organic Evaporated Cane Juice Sugar is fine enough for the job.
My cookies don't look as pretty as Martha's. I didn't understand the instructions about the ruler, and looking at the accompanying picture in the magazine didn't help to explain it at all. So they're sort of squiggly around the edges rather than smoothly round. Also, the first batch is a little over-done. I think I sliced them too thin. They're dry, but in a yummy shortbread kind of way.
The taste is buttery delicious! And the rosemary makes them seem so classy, like they should be served with high tea. File under "in case the queen comes to lunch."
1 cup (2 sticks) unsalted butter, softened
3/4 cup granulated sugar
1 large egg
1 tsp vanilla extract
2-1/2 cups sifted all-purpose flour
1 Tbs chopped fresh rosemary
3/4 tsp salt
1/2 cup fine sanding sugar
1. Put butter and granulated sugar in the bowl of an electric mixer; mix on medium speed until light and fluffy, about 2 minutes. Mix in egg and vanilla. Add flour, rosemary, and salt; mix on low speed until incorporated.
2. Divide dough in half; shape each piece into a log. Place each log on a 12-by-16-inch sheet of parchment. Roll in parchment to 1-1/2 inches in diameter, pressing a ruler along edge of parchment at each turn to narrow log and force out air. Transfer to paper-towel tubes. Freeze 1 hour.
3. Preheat oven to 375. Line a baking sheet with parchment paper. Roll logs in sanding sugar; slice 1/4 inch thick. Arrange 1 inch apart on prepared baking sheet. Bake until edges are golden, 18 to 20 minutes. Transfer to wire racks, and let cool.
Makes about 5 dozen.
I used Bob's Red Mill GF All-Purpose Baking Flour. And I'm never certain when I should be sifting before measuring and when I should be sifting after. I chose after. And I used a Martha trick of stirring it with a whisk rather than pushing it through a sifter. In place of sanding sugar, which sounds very fancy-shmancy, I found that the Trader Joe's Organic Evaporated Cane Juice Sugar is fine enough for the job.
My cookies don't look as pretty as Martha's. I didn't understand the instructions about the ruler, and looking at the accompanying picture in the magazine didn't help to explain it at all. So they're sort of squiggly around the edges rather than smoothly round. Also, the first batch is a little over-done. I think I sliced them too thin. They're dry, but in a yummy shortbread kind of way.
The taste is buttery delicious! And the rosemary makes them seem so classy, like they should be served with high tea. File under "in case the queen comes to lunch."
09 September 2007
book review: Cookoff
 Cookoff: Recipe Fever in America, by Amy Sutherland
Plain and simple, Americans love competetion and Americans love food. Competetive cooking is a natural.
I'm actually not a Food Network watcher, but I may start. This book was fascinating. If you thought that cook-offs are for homemakers at the state fair, you are wrong. There are cooking competitions for the every-day home cook that have prizes worth thousands of dollars. Women who have high-profile, stressful jobs and Type A pesonalities turn to "contesting" as a semi-professional hobby and have kitchens filled with millions of dollars worth of prizes to show for their efforts. Men who have tinkered around in the kitchen once or twice suddenly find themselves with a grand-prize-winning recipe in their hands.
The book is also a discussion of America's love of convenience foods. The author points out that we will spend hours upon hours commuting or watching television without batting an eye, but when Americans cook the food has to be ready in 30 minutes or less. These competitions, particularly the Pilsbury Bake Off, also rely on processed foods, and even the "light" entries are often not that healthy for you.
The contesters who enter dozens of competitions every year are constantly thinking of the mass appeal of a dish, assuming that's what the judges look for in a winning dish. Many believe spinach doesn't have family appeal, for instance. One entrant had to change the name of her dish from Morroccan Chicken to Couscous and Chicken because the judges didn't want a winning dish to sound so "ethnic." In a way, rather than broadening the minds of Americans, foodwise, these competitions dumb down food to the lowest common denominator.
But there's no coverup involved here. Everyone knows the point of these competitions is to sell more product. These competions are a cheap way for Pilsbury or the National Beef Council, or whichever corporation is sponsoring the event, to create recipe libraries without the upkeep of test kitchens. The kitchens of America are the test kitchens. And thousands of recipes are tested and mailed in every year.
I'm now considering Googling "cooking contests" and submitting a recipe or two. I can't eat any of the winning recipes that are published in the book. It would be nice to have a little gluten-free representation out there.
07 September 2007
baked eggplant with feta and tomatoes
AFter my produce delivery left me without basil, I had to change my plans from the egglplant with basil and feta that I'd been craving. I remembered that a couple years ago I jotted down a recipe from a seed catalog at my mom's house, stuck it in my recipe notebook, and never made it. Left with a giant eggplant and handfuls of tomatoes but no basil, it seemed like a good time to try it.
From the Seeds of Change print catalog (they don't appear to have this recipe on their website). I've typed this in here exactly as I wrote it down at the time. The original recipe in the catalog might be different.
First off, I used just one eggplant for the two of us (we still ended up with some leftovers). I had to pan fry the eggplant slices one at a time, and the eggplants soak up a lot of oil. But maybe I used too little; I didn't measure. Be very careful when handling slippery eggplant halves around hot oil! I had a bit of a splash and thankfully didn't get any oil on my skin, but hopefully did not ruin a favorite pair of shorts.
I used 5 or 6 roma tomatoes, which weren't very juicy. I chopped them ahead of time, not removing the skins or seeds--we like lots of chunky texture. I let them sit in a bowl for a bit with some salt to help bring out the juice and I minced 3 cloves of garlic and tossed it in to sit with the tomatoes.
The garlicky tomatoes smelled so good during their heating up time that I became very hopeful for this dish. I don't really like eggplant that much but it's a good vehicle for foods I do like. I spooned my tomatoes over the eggplant and crumbled my feta, then put it in the oven and forgot about it for 40 minutes. I forgot to add any dried herbs, but I think I'll add them next time. I also think I'll pay closer attention to the eggplants while baking because they were a tad too mushy. I think a few minutes less would have been better.
Anyway, it's a pretty basic meal, and I'm sure just about everyone out there can do something better with eggplant than I can.
(For a premeal snack we had cantaloupe and prosciutto, both from my food delivery yesterday. Super yummy.)
From the Seeds of Change print catalog (they don't appear to have this recipe on their website). I've typed this in here exactly as I wrote it down at the time. The original recipe in the catalog might be different.
4 eggplants
1/3 cup olive oil
feta cheese
salt & pepper
4 tomatoes, peeled, seeded, and chopped
Preheat oven to 375. Slice eggplant in half lengthwise and score cut sides in criss-cross pattern. Heat 3 Tbl oil in large skillet. Add eggplant, cut sides down, and fry over medium-high heat until golden. Fry other side for a few minutes then remove to plate and salt and pepper. Wipe out pan. Heat 1 Tbl oil, add tomatoes and cook over medium-high heat until broken down into chunky sauce, 5 to 10 minutes. Salt and pepper to taste. Put eggplant cut sides up in a baking dish. Crumble cheese, spoon tomato over, sprinkle with dried oregano. Cover and bake until eggplant is tender, about 40 minutes. Uncover and back 5 minutes more.
First off, I used just one eggplant for the two of us (we still ended up with some leftovers). I had to pan fry the eggplant slices one at a time, and the eggplants soak up a lot of oil. But maybe I used too little; I didn't measure. Be very careful when handling slippery eggplant halves around hot oil! I had a bit of a splash and thankfully didn't get any oil on my skin, but hopefully did not ruin a favorite pair of shorts.
I used 5 or 6 roma tomatoes, which weren't very juicy. I chopped them ahead of time, not removing the skins or seeds--we like lots of chunky texture. I let them sit in a bowl for a bit with some salt to help bring out the juice and I minced 3 cloves of garlic and tossed it in to sit with the tomatoes.
The garlicky tomatoes smelled so good during their heating up time that I became very hopeful for this dish. I don't really like eggplant that much but it's a good vehicle for foods I do like. I spooned my tomatoes over the eggplant and crumbled my feta, then put it in the oven and forgot about it for 40 minutes. I forgot to add any dried herbs, but I think I'll add them next time. I also think I'll pay closer attention to the eggplants while baking because they were a tad too mushy. I think a few minutes less would have been better.
Anyway, it's a pretty basic meal, and I'm sure just about everyone out there can do something better with eggplant than I can.
(For a premeal snack we had cantaloupe and prosciutto, both from my food delivery yesterday. Super yummy.)
06 September 2007
organic produce delivery
I think my place in hell has been reserved. You know, in that special area set aside for smug San Francisco-area people. This morning I received my first delivery from Planet Organics, and I love it. I haven't figured out yet if it's saved me any time or money, and I'm not sure I care. It's so convenient. And it does help with the shopping and meal prep organizing that I'm trying to bring under control.
I'm not particularly concerned with organic and non-organic. My concern is delicious produce that's affordable. I spend a lot of time pouring over every piece of fruit I buy, whether it's from Safeway, Whole Foods, or farmers' market. With Planet Organics, someone else spends their time picking the good stuff for me and the price is about the same as what I'm paying elsewhere.
And I'm not so terribly busy that I don't have the time to go shopping. I can do it. I just don't like to. Why not get a little package delivered to my door every week?
They offer some specialty grocery products, so I can treat us to the occassional prosciutto or fancy cheese.
You can choose a variety of delivery options, such as all fruit, all veggies, 2/3 fruit, or half-n-half. You can set up a standard order and be surprised with each delivery or you can specify exactly what you want from their available stock that week. It comes in a reusable plastic tote box with minimal packing materials. After you've put your groceries away, throw the packing materials back in the tote and give it back to the delivery person next time.
I like knowing what I'm going to get so I can plan meals. However, I didn't know basil would be out of stock until I opened my tote today, and I'd planned several meals around fresh basil. I wanted one more week of summertime basil! I guess I'll live, but I haven't figured out yet what to do with all the tomatoes I'd gotten to eat with all the basil.
rosemary roasted pork tenderloin
A couple years ago I came home with a handful of fresh, beautiful rosemary from farmers' market and had no idea what to do with it. (I tend to make impulse produce purchases.) A Google search for rosemary recipes led me to this one on About.com.
We've modified it a bit for ourselves. Last night for the first time we did just one tenderloin, and it worked out much better for our dinner and leftovers needs. I always forget to spray the aluminum foil with oil and it doesn't seem to matter. We love garlic, so we use several cloves sliced into spears, and stick them into the meat for roasting.
On the side I had a small plate of red pepper slices and cucumber spears; it's still summer afterall, so we should be eating lots of cool, crisp veggies. I also roasted some potatoes--a handful of fingerlings, a purple one, and a sweet potato--with salt and pepper, and I tossed in one of the rosemary sprigs.
INGREDIENTS:
2 pork tenderloins, about 2 pounds
3 tablespoons fresh rosemary, or about 1 tablespoon dried
1 tablespoon olive oil
2 cloves garlic, halved
salt and pepper to taste
PREPARATION:
Preheat oven to 400°. Line a baking pan with foil, spray with cooking spray and place in oven. Trim fat from pork tenderloins and butterfly the meat, cutting them nearly in half lengthwise. Open the pork tenderloins and lay out, pounding to flatten with the palm of the hand or the bottom of a heavy skillet.
Chop rosemary if using fresh. Rub pork tenderloins all over with cut sides of garlic halves then olive oil, then sprinkle rosemary on both sides.
Remove baking pan from the oven and place pork on hot tray. Return to oven and roast for about 20 minutes (about 155° to 160° internal temp). Remove and let stand 5 minutes, then slice.
Rosemary roasted pork tenderloin serves 4 to 6.
We've modified it a bit for ourselves. Last night for the first time we did just one tenderloin, and it worked out much better for our dinner and leftovers needs. I always forget to spray the aluminum foil with oil and it doesn't seem to matter. We love garlic, so we use several cloves sliced into spears, and stick them into the meat for roasting.
On the side I had a small plate of red pepper slices and cucumber spears; it's still summer afterall, so we should be eating lots of cool, crisp veggies. I also roasted some potatoes--a handful of fingerlings, a purple one, and a sweet potato--with salt and pepper, and I tossed in one of the rosemary sprigs.
Subscribe to:
Posts (Atom)