26 October 2007

cranberry zucchini muffins

Are those silicon baking things supposed to steam and smell like melting plastic about 5 minutes after you put them in the oven? I didn't think so. But nothing appeared to be melting or burning, so I decided to let the baking run its course.

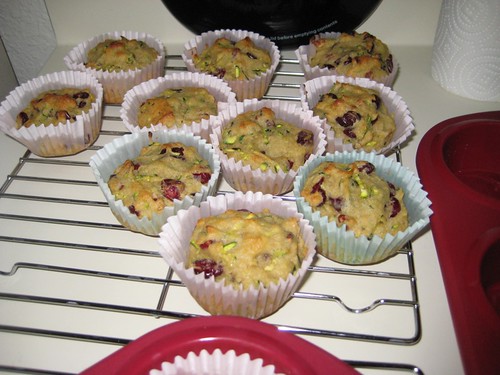
I'm still getting some good, locally grown, inexpensive summer squash, so why not one more go-round with the zucchini quick bread recipe I tried a few months ago? I used dried cranberries this time and decided to go with muffin form instead of a loaf of bread.
2 eggs
1/2 cup honey
1/2 cup butter, melted, or oil (I used canola oil)
1 tsp vanilla
1 1/2 cups zucchini, peeled and shredded
1 cup yellow raisins (I used dried cranberries)
1/2 cup plain nuts, chopped (I used pecans)
1 cup rice flour (I used white rice flour)
1/2 cup millet flour
2 tsp baking powder
1 1/2 tsp xanthan gum
2 tsp cinnamon
1/2 tsp salt
1 envelope (.25 oz or 7 g) gelatin

Preheat oven to 350. [Place cupcake liners in muffin pans.] Beat eggs. Add honey, butter or oil, vanilla, grated zucchini, [dried cranberries], and nuts to beaten eggs. Sift together flours, baking powder, xanthan gum, cinnamon, salt, and gelatin. Fold dry ingredients into liquids--this will keep it light (stirring it all gently works too). Pour into prepared pans. Bake for about [15] minutes. (Info in brackets is what I modified for making muffins instead of the quick bread this is the recipe for in the book The Best-Ever Wheat- and Gluten-Free Baking Book.)

I think that muffins are great for this recipe and the cranberries are better than the apricots I used last time. Instead of a dense, rich bread, I have tasty little pops of muffiny goodness. They are moist, but not too moist. And they aren't too sweet, which makes them perfect for breakfast. They aren't terribly attractive though. I think that's a trade-off when dealing with homemade muffins. They taste 1,000 times better than something you'll buy in a package, but let's say they, um, have rustic charm in the looks department.

cranberry zucchini muffins

The steaming muffin pans seemed to not be a problem. The muffins taste fine. And if they are poisonous, well, then at least I'll go with a tummy full of yummy muffins.

24 October 2007

pierogi part 2

pierogi!

The pierogi were a success! (See also pierogi part 1.)

We used the Homade Pasta recipe in Bette Hagman's The Gluten-Free Gourmet Revised Edition. This is the basic recipe. For making pierogi or raviolli, triple it. We found that we got about 3 dozen pierogi.
Ingredients:
1/3 cup Tapioca Flour
1/3 cup Cornstarch
2 Tb Potato Starch
1/2 tsp Sea Salt
1 Tb Xanthan Gum
2 large Eggs
1 Tb Vegetable Oil

Combine flours, salt, and xanthan gum. Beat eggs lightly and add oil. Pour egg mixture into flour mixture and stir. This will feel much like pastry dough. Work together into a firm ball. Knead a minute or two.

The recipe in the book and online give further instructions depending on the different kinds of pastas you could make. For the purpose of making pierogi, you'll want to work with small handfuls of dough. Roll it out, with just the minimum amount of flour necessary to keep it from sticking. Too much flour will toughen the dough and keep it from being as sticky as it needs to be. Roll it out to about 1/8 of an inch. Use a biscuit cutter or glass or jar lip to cut circles about 4 inches in diameter. Keep rolling dough until you've made as many circles as it will yield.

Use your fingertips to wet the edges of each circle. Let the water sit for few minutes, making a nice, sticky edge. (By the time you get to the last circle, the first one should be just sticky enough. Spoon some filling into the center of each circle. Fold the circle in half, pinching and crimping the edges until they are sealed tight.

Any that you are cooking right away, set aside. Any that you will be freezing, place on a cookie sheet and put them in the freezer until they are dry. Once they're no longer sticky you can put them in freezer bags.

To cook, place pierogi in a large pot of salted boiling water for 10 to 15 minutes (and hope you sealed them tightly enough!). Remove with a slotted spoon. Serve with hot melted butter.

Our three different fillings were delicious. The potato and cheese tasted just like I remember them from the pre-gf days. The squash ones were a little like pumpkin empanadas. And the rice and sausage were like... something yummy stuffed with rice and sausage.

20 October 2007

pierogi part 1

My mom and I are going to make gluten-free pierogi! (We hope Babci doesn't mind us using an untraditional recipe. I'm sure she'd want me to be eating pierogi in any form that I can.)

We went back and forth through cookbooks, wondering if we should use a gf ravioli recipe for the dough or if we should use a more traditional pierogi recipe and substitute a gf flour mix. My mom couldn't remember the exact recipe her grandmother used off the top of her head, except to know that the recipes we were finding did not use any potato in the dough and she knows Babci used potato. We decided to use one of the pasta recipes in Bette Hagman's Gluten-Free Gourmet Revised Edition. It at least uses potato starch. (And if our pierogi are a tad lighter and healthier than the old-fashioned kind, then I guess we can just eat more of them!)

This morning we worked on fillings. We will make some with a traditional potato-cheese filling. I boiled and mashed a pound of potatoes and mixed in some farmers' cheese to taste. I also added a small bit of sauteed onions and a dash of pepper. (The cheese was salty enough; I didn't want to add more.)

We will also make some with untraditional fillings. While looking for pierogi recipes in The Joy of Cooking I found a winter squash ravioli stuffing. Yum! I had two small delicata squashes, so I baked them and mashed them. I added a small amount of the farmers' cheese and dashes of salt, pepper, and nutmeg. You don't want your pierogi filling to be too moist and mushy so I may need to add some flour or starch to thicken up the otherwise watery squash.

And off the cuff we're thinking of dicing some Aidell's mango sausage and mixing it up with some rice and melty sharp cheddar cheese.

Pierogi can easily take a whole weekend to make, especially if you're making the tradional seemingly thousands of them (enough to freeze and reheat 3 meals a day all winter long, plus have a huge feast of them at Christmas time). We made the potato and squash fillings this morning and will prepare the sausage and rice filling just before we start on the dough (the sausage is pre-cooked). Rolling out the dough and making all those little circles takes forever, and then it takes forever again to fill them and seal them. (That's why you have an army of children work on them, assembly-line style.)

This evening my kitchen will be a pierogi factory, with just my mom and I as the workers. I remember this being quite exhausting as a child. If you don't see Part 2 appear in a few days, send for help.

(P.S. By "traditional" I mean what my babci would have done, or my memory of what she did. Your babci may have completely different recipes and techniques.)

spring rolls

My mom's in town for a week, so I had a helper for my first attempt at making spring rolls. We are having warm sunny weather during the days, so cool salad-type lunches are in order.

You can buy spring roll wrappers in the Asian foods aisle of most major grocery stores. I also bought stick noodles for the filling and Thai Kitchen peanut satay sauce for dipping. (Thai Kitchen labels their gluten-free products clearly.)

First we prepared all the fillings. We cooked the noodles so they'd have a few minutes to cool and get sticky while we got the other fillings ready. We had lettuce, sunflower sprouts, carrots (purchased pre-sliced for ease), mango, yellow pepper, and some tiny shrimp for my mom. You can pretty much take any fruits or veggies out of the crisper drawer and slice them up. It's a good way to clean out small amounts of something before it goes bad. (I was hoping to add some mint and cilantro, but they expired. It's the risk you take when dealing with fresh food sometimes.)
Spring Rolls: Mango and yellow pepper
We decided to make one spring roll at a time, because it takes up a lot of counterspace, more than I really have in my kitchen. I filled a square glass baking dish with warm water and submerged my spring roll wrapper for about 20 seconds. Then I placed it on a clean, damp tea towel (which I had previously placed over the cutting board I was using as the wrapping work station). I pulled up the edges of the towel and blotted the wrapper until it was slightly sticky. Then I put my fillings in.

It's best to keep the fillings as log-shaped as possible, and don't let them get too close to the edges.
Spring Rolls: Ready to roll
Once the fillings are in place, bring up the bottom of the wrapper, trying to keep the fillings as tight as possible before letting the wrapper seal with the top part. Fold in the left and right edges, then roll up tight. You'll find the wrappers can take quite a bit of rolling abuse, as long as you don't try to unseal and unroll them.

Our first ones were sort of loose and fillings spilled out on the plates when we sliced them in two. Our second ones were much tighter. You really can pack a lot in them.

Spring Rolls

These can also be deep-fried. I haven't tried that yet, but looking forward to giving it a whirl!

It's fun to make these, and I bet it's a good project for kids, but it's a lot of work for basically a salad. I'm sure I'll get faster the more I make them.


This is my entry for Weekend Herb Blogging. This is a weekly event that collects recipes for herbs and vegetables, sponsored by Kalyn's Kitchen. This week it's being hosted by The Well-Seasoned Cook, so head over there on Monday to check out the weekly recap of recipes.

07 October 2007

valencia oranges with pomegranate vinaigrette

Pomegranates on the porch
I've had very little experience with pomegranates other than enjoying the Persephone myth. I think that until I moved to California (at the age of 25) I assumed they were some sort of exotic Ancient Greek food that wasn't even around anymore. (We just didn't have pomegranates in Rhode Island.) But they've become all the rage recently because of their healthy juice. I tried it once, a couple years ago, and wasn't that impressed. When I saw that pomegranates were coming in season I decided to give them another chance. I'm supposed to be trying new things--or revisiting and retrying old things.

I got 2 pomegranates in my Planet Organics order this week and they've been sitting on the counter for the last few, days waiting for me to decide their fate. I browsed through some books and the Melissa's website. Finally I settled on juicing them for a syrup. I had grandiose ideas of making buckwheat pancakes with pomegranate syrup one morning. Yeah, that didn't happen. I drink coffee and eat a banana. I don't make breakfast.

Per the directions in Melissa's Great Book of Produce, I rolled the pomegranates on the hard countertop, listening for the popping juice sacs. Then I tried to make a little slit in the first one. Juice spurted out all over. I managed to get most of it into the dish. I squeezed and squeezed, and juice was dribbling out. So I made the slit bigger. More juice. But eventually I squeezed the poor thing to death and it ripped apart in my hands. Heh, seeds. I nibbled on a few. The ones that still had red stuff around them were sweet, like little candies. Since some seeds fell in my juice, and I didn't feel like straining or scooping them out, and the pomegranite didn't yield as much juice as I thought it would, I changed my mind to making a vinaigrette. I've made a raspberry vinaigrette for citrus salad before and I had some citrus on hand, so it was a perfect new plan. The seeds would be a nice little crunch.

The skin of the second pomegranate started to tear as I was rolling it on the countertop so I had to quit doing that and try to squeeze out as much juice as possible, before all the juice sacs were actually broken. So, not as much juice, but more sweet seeds.

After juicing pomegranates, your kitchen will look sort of like a crime scene.
The scene of the crime
I whisked the juice with some champagne vinegar and olive oil. It turns out the only citrus I had were valencia oranges. (I usually like to make a citrus salad a little further into the winter, with a mix of blood oranges, tangerines, ruby red grapefruits, ie, more of a variety.) I sliced the peels off, then separated each segment.
Peeling an orange
I had planned to have this for dessert, but I changed my mind and ate it as a snack before I started cooking dinner. It was so sweet and tasty.
Oranges with pomegranate vinairgrette
I saved the orange peels and later in the evening, after I was done making and eating dinner, I simmered them on the stovetop with a cinnamon stick. Garlic smells great while it's cooking, but afterwards it needs to be eliminated. Orange and cinnamon is much more pleasant.


This is my entry for Weekend Herb Blogging. This is a weekly event that collects recipes for herbs and vegetables, sponsored by Kalyn's Kitchen. This week it's being hosted by Cook (almost) Anything, so head over there on Monday to check out the weekly recap of recipes.

(I got a new camera this week. Thanks Mike! Clicking on any photo will take you to the full-size image on flickr.)

03 October 2007

enjoy life soft baked double chocolate brownie cookies

I have a backlog of product reviews I've been working on and this morning I made my monthly trip to Whole Foods to stock up on gluten-free cookies and crackers. They had some of my favorites on sale and they had some new things I hadn't tried yet. So now I have a cupboard full of new foods to eat and review.

Today's victim: Soft baked double chocolate brownie cookies from Enjoy Life. Phew, what a name! With all those descriptors, you'd expect the taste to be, well, chocolatey. (More on that in a second.)

Enjoy Life does a great job of package labeling, letting you know exactly what isn't in their products. They pride themselves on allergen-free foods. And that's good. More companies should practice better labeling. These cookies can be eaten by nearly everyone (except those with a chocolate allergy). They are vegan and kosher. They're free of dairy, wheat, peanuts, tree nuts, eggs, soy, fish, shellfish, casein, potato, sesame and sulfites. (You wouldn't expect most of those things to be in a cookie anyway, so there's a little bit of alarmist jargon going on here.)

You're right to be suspicious and wonder what's in them, if they're absent of all that good stuff. There is cocoa and sugar, but not nearly enough of either. The chocolate chips don't taste like chocolate at all. You know how stuff sweetened with fruit juice just doesn't taste the same as stuff sweetened with sugar? These are sweetened with a lot more fruit juice than sugar and that's evident in the taste. And wouldn't you expect double chocolate brownie cookies to be dark brown, like brownies? They are tan. A tan brownie cookie should have been my first red flag. I thought maybe the photography on the box was just not very good.

The texture is decent. Not Chewy Chips Ahoy soft, but softer and chewier than I expected.

On a green note, they are packaged in a cardboard box, a plastic bag, and a plastic tray. And all the cookies fell out of the tray and stuck together anyway, so the tray is evidently useless.

I just didn't find these cookies satisfying. If you grew up eating low-sugar health food stuff and don't know an Oreo from a Keebler Elf, then you might enjoy these cookies. If you're on an extremely limited diet and have few snack food choices, then these might do it for you. But if you are a card-carrying junk food junkie who is newly adapting to the gluten-free diet, pass these by.

roasting acorn squash and baking bread

Tonight I made squash inspired by Thyme for Cooking. In looking at her photo, I see that I sliced my squash in the wrong direction. I don't think it made a difference. Also, I didn't have any dried rosemary but dried thyme was a tasty substitute. My squash was from Planet Organics. I used half a squash, since dinner was just for me tonight. On the side I heated up some leftover rice and shelled edammame.

While my squash slices were in the oven I went over my list for this week's Planet Organics delivery. I've decided to reduce the number of plain old apples and oranges and add some splurge items. Hopefully, if they're not sold out, I'm getting some first-of-the-season pomegranates. I'd also like some Mt. Tam cheese and basil and tomatoes.

I'm baking bread this evening. I'm putting the elements in order for the perfect storm of grilled cheese sandwiches. However, as I'm typing this, I can smell my bread burning slightly. For the first time ever, it has flowed over the top of the bread making bucket. I'm not sure if I should unplug it, or maybe just scoop off the overflow, or just let it go. Currently I'm opting for letting it go and seeing what happens.

01 October 2007

squash, rice, veggies & tofu: convenient and in one pan

I read on the back of my Imagine Creamy Butternut Squash Soup carton that it should be poured over rice for a delicious side dish. I started thinking that if it can be poured over rice, then it can be poured over rice + other stuff to make a curry-like concoction.

First I quartered and cooked 2 purple potatoes in a small saucepan until soft. (I was cooking just for me tonight, so a small saucepan was plenty.) When cooked I let them sit in a strainer for a few minutes in the sink. In the same small saucepan I mixed in some soup, leftover rice, and cubed tofu. I added some garum masala, salt, fresh ground black pepper, a pinch of crushed red pepper and a dash of cumin. (All the spices were "to taste" and I added more of some things as the cooking went on.) I kept this on medium on the stovetop for a little bit. Then I put the potatoes back in and added some red pepper slices and string beans (both from farmers' market this morning). When it started simmering I turned the burner down to low. I just let it sit and kept tasting until everything seemed hot enough. I wanted the peppers and beans to be warm but crisp.


I don't know a lot about Indian spices and cooking. It didn't taste complete and I'm not sure what else I should have done. It was pretty tasty but something definitely seemed to be missing.

I'm not a huge soup fan, but I started eating some of the Imagine soups last winter when Mike was away from home and I was lonely and just wanted easy, fast, warm food. The gluten-free ones say so right on the back of the carton. You have to watch out for cartons and cans of soup. Often wheat flour is used as a thickener. What's so stupid is at my Safeway they don't have the Imagine soups on the same shelf as all the other soups. You have to go down the health food/gourmet aisle. Why must they segregate the foods like that?

(Sorry for the poor photography. I am without the good camera for a bit.)

ShareThis

LinkWithin

Related Posts with Thumbnails